

How To Dual Boot Windows 8 And Linux
Before we begin …
This guide is intended for a estimator that is already running Windows 8.1, with enough hard-disk infinite left so we can install Ubuntu next to Windows. Ubuntu recommends more than than half-dozen.4Gb, as it uses 6.4Gb for the install lonely. And then probably best to aim for at least say 20Gb of disk space yous will need, just become college if you can – I took 100Gb (84Gb Ubuntu and 16Gb swap).
Tip : Read the entire commodity earlier actually doing anything ..
Note : Exit some Gb's available for your Windows partition … Windows needs extra infinite for information technology's bandy file.
Note : Windows 8 and newer volition very likely work much the same fashion.
Note : I'm not a Linux practiced, I assume there are better means to practice certain steps, just this worked for me.
Tip : You can open this webpage in Ubuntu when you're running the live version from your USB stick. Makes Copy/Paste easier![]() …
…
Total Destruction at your own run a risk!
Non likely that this will happen, full devastation, just the steps we accept in this guide can result in a figurer that will no longer boot your Windows setup, and might crave a total reinstall of everything from scratch. Consequences like loss of all data should be expected!
So please please please pay attending to what you're doing,… don't blame united states of america if your house implodes!
Running Ubuntu straight from USB … just 3 steps …
If you are more than interested in just running Ubuntu from a USB stick, so you will simply need to follow these 3 steps:
Footstep 1 – Create a Bootable Ubuntu USB stick
Step 4 – Plow OFF Fast Boot
Pace 5 – UEFI BIOS Settings to Enable kicking from USB
Using the kick menu or giving USB the highest boot priority in the BIOS, will make it that y'all can boot Ubuntu when you run into fit.
Especially on USB iii.0 drives in a USB 3.0 port, this piece of work surprisingly well …
You might all the same need a separate storage devices to save your files … or figure out how to save files on your Ubuntu USB stick.
Tools we demand …
Get-go you'll need a Ubuntu 14.10 install ISO file , which tin be constitute on the Ubuntu website.
For most modernistic computers, the 64-bit version volition do. Take the 32-bit version if your computer has limited memory (<2Gb).
The 64-bit AMD (Mac) version is a special 64-fleck version for MacOS X computers, and then don't confuse that with the regular 64-bit version.
I used Ubuntu Desktop 14.04 64-scrap and my figurer was already running Windows 8.1.
Next we demand a tool called " Universal USB Installer " which helps united states create a bootable USB drive or USB stick.
Download it from their website, to brand sure you get the latest version, or download a copy from Tweaking4All.
Download - Universal-USB-Installer
| Filename: | Universal-USB-Installer-ane.9.5.4.exe |
| Platform: | Microsoft Windows |
| Version: | one.nine.v.4 |
| File size: | 1.1 MB |
| Date: | 2014-07-13 |
| Download Now Send me a cup of Coffee | |
OK, when yous take all that, and of grade a computer running Windows viii.x, time to go started …
Ad Blocking Detected
Delight consider disabling your ad blocker for our website.
We rely on these ads to be able to run our website.
You can of course back up u.s. in other ways (encounter Support Us on the left).
Stride 1 – Create a Bootable Ubuntu USB stick
We accept 2 options here: either create a bootable USB stick or a installation DVD.
For convenience and non wanting to waste material another DVD, I recommend using the USB Stick method, specially when you have USB 3.0 bachelor (computer and stick).
For those that wish to burn a DVD: Use your favorite disk called-for awarding to burn the downloaded Ubuntu ISO file to DVD.
Creating a bootable USB stick is relatively like shooting fish in a barrel with "Universal USB Installer".
Download the application and double click it to get information technology started.
- Select Ubuntu from the "Select a Linux Distribution" drib downwards.
- Click "Scan" and select the downloaded Ubuntu ISO file.
- Select the correct drive at "Select your USB Flash Bulldoze Letter".
- Check "We volition format X:\ Drive as Fast32".
- Click "Create" to start the process.
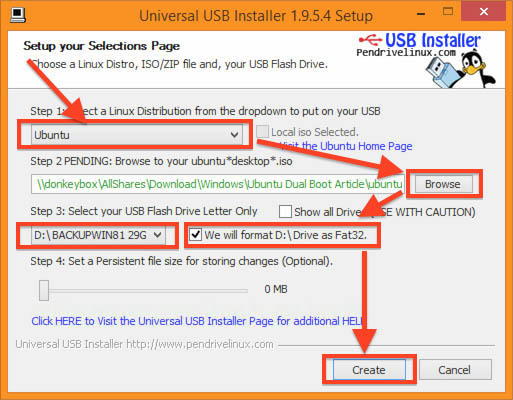
Universal USB installer
After clicking "Create" a recap will be shown of the planned deportment – please verify them before clicking "Yep".
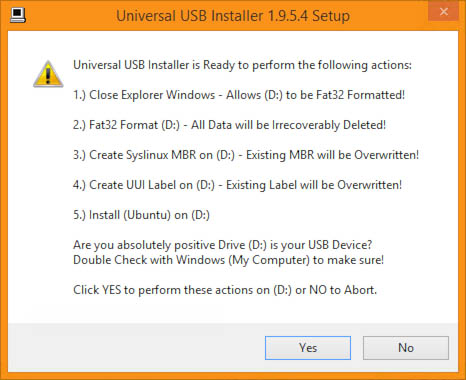
Universal USB Installer – Planned Deportment
After clicking "Yes", a few windows volition wing past indicating work in progress …

Universal USB Installer – Prepping USB Drive
Note that during this process, the ISO fill up will be taken apart (which takes a little time), and your USB stick volition be prepped.
Once you see the message "Installation Done, Process is Complete!" (in the black part of the window, in green text), your USB stick is done and ready.
Click "Shut" to shut Universal USB Installer.
Footstep ii – Make a fill-in of your current Windows setup
Backups are funny – yous but need them when you didn't brand one … so we meliorate play it save, since nosotros volition be doing some pretty drastic things to your harddrive. Windows 8.ane comes with the tools we need to create a recovery drive (USB Stick, at least 16GB, USB 3.0 recommended if your computer supports it) and a backup of your personal files (depending on your computer, this might exist a lot of files, and a network share or larger USB drive might be needed).
In that location are other ways of doing this, so exist my guest to pick your preferred method and tool. Hither we use the standard Windows tools.
Before making backups …
This is a good time to:
- Brand certain all Windows UPDATES are Done … Avert a nasty forced Window update in the process.
- Old stuff (documents, programs, Ubuntu ISO, etc) are REMOVED. No need to backup those.
Creating a Recovery Drive
For this you volition need a 16 Gb USB Stick (or larger). If your estimator supports USB 3.0 and you take a USB 3.0 stick laying effectually, then by all means use it! It makes a huge difference and will save you a lot of fourth dimension. This is NOT the aforementioned USb stick we just used for Ubuntu!
To become to Windows Recovery, open a Windows Explorer window and paste "Control Console\All Control Console Items\Recovery" in the address bar (without the double quotes of course) and printing ENTER.
Note : I assume that this Recovery option will look similar for Windows 8. For Windows vii withal, information technology volition look very different, and it nigh certainly does non exist under Windows XP.
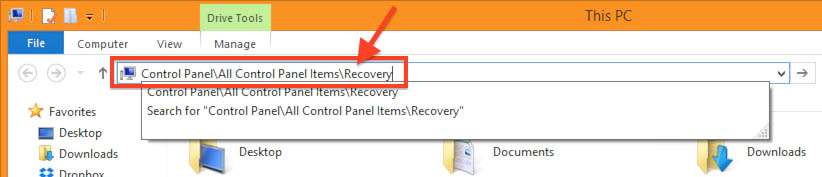
Windows 8.i – How to get to Recovery Tools
From the "Recovery" window, select the "Create a recovery drive" option.
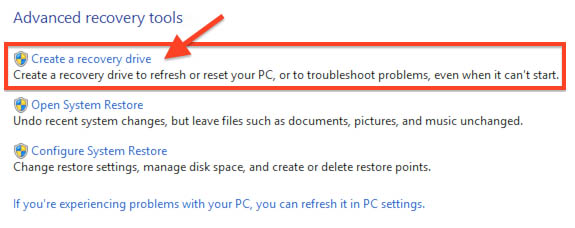
Windows eight.ane – Recovery – Select "Create a recovery bulldoze"
This will guide you through a sorcerer to create a recovery drive.
Check "Copy the recovery partition from the PC to the recovery bulldoze" and click "Adjacent".
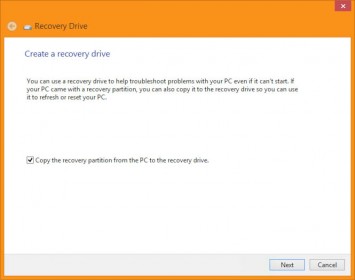
Recovery Wizard – Check "Re-create the recovery partition"
In the side by side window, yous'll have to select the right USB drive – this will be the drive that Windows volition use to store the recovery data on.
Click "Next" when washed.
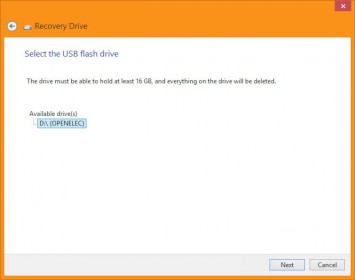
Recovery Wizard – Select the USB bulldoze
In the next window, yous'll go a alert that the selected drive will be totally erased, and if yous're certain yous selected the right drive, click "Adjacent".
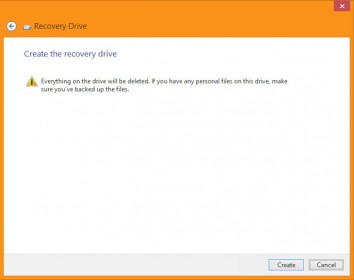
Recovery Wizard – Confirmation to erase
Now it'due south a matter of waiting … catch a snack and a drinkable if you lot'd like … or write an commodity for your website (that's what I'm doing) …![]()
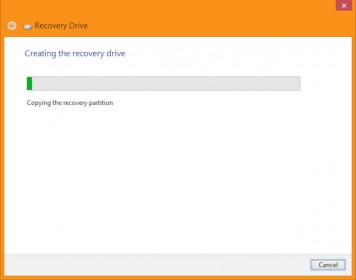
Recovery Wizard – Creating Recovery Disk
The entire process took only a few minutes on my setup – but this all depends on the speed of your estimator, USB port and USB drive.
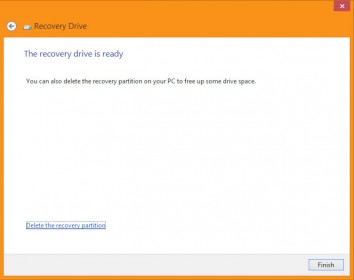
Recovery Wizard – Finished
In one case completed, click "End", and remove the USB drive properly (use the Windows Eject selection), and store it in a safety place … you'll need information technology when things go Due south on ya.
Backup your Personal Files
In this stride we will backup your files and such, which might demand more space – all depending on what you lot've nerveless over time.
I will not spent too much time on this particular backup method, I shop all my files on my NAS, so anything on my computer tin go anyway.
For files that are stored in "My Documents", you can apply the "File History" tool.
First you'll need to connect a drive, a USB drive for example.
To get to this tool, paste "Control Panel\Organization and Security\File History" in the accost bar of Windows Explorer.
It will correct abroad seek a suitable drive. You'll see a button "File History" which nigh probable is set to " OFF " at this moment.
Set it to " ON " and click the at present functional button "Backup At present".
Alarm : this will but fill-in your files from "My Documents"!
And so if you take stuff laying around elsewhere, you will need to manually back those up as well.
Advert Blocking Detected
Please consider disabling your ad blocker for our website.
We rely on these ads to be able to run our website.
Yous tin can of course back up united states in other ways (see Support United states of america on the left).
Footstep 3 – Brand room on your hard-drive for Ubuntu
Now that we have either a bootable USB Stick/Bulldoze (or DVD disk), and a recovery bulldoze for Windows, fourth dimension to make fix your hard-drive for Ubuntu.
Resizing/Shrinking your Windows sectionalisation is relatively like shooting fish in a barrel – given that you lot have enough hard-disk infinite.
For this we will use the "Deejay Management" tool, which tin can exist found in the "Control Console" – if you tin't discover information technology, type "Deejay Management" in the search box of the Command Panel window.
Once "Disk Management" opens, you will most probable run into an unexpected number of partitions … the days of Windows XP and one or two partitions seem over with all the recovery partitions these days. Multiple Recovery Partitions (really?), an EFI partition and finally a "C:" sectionalisation.

Windows 8.1 – Disk Management
To shrink the "C:" segmentation, right click the C-partition first and select the "Shrink Book…" option from the popup menu.
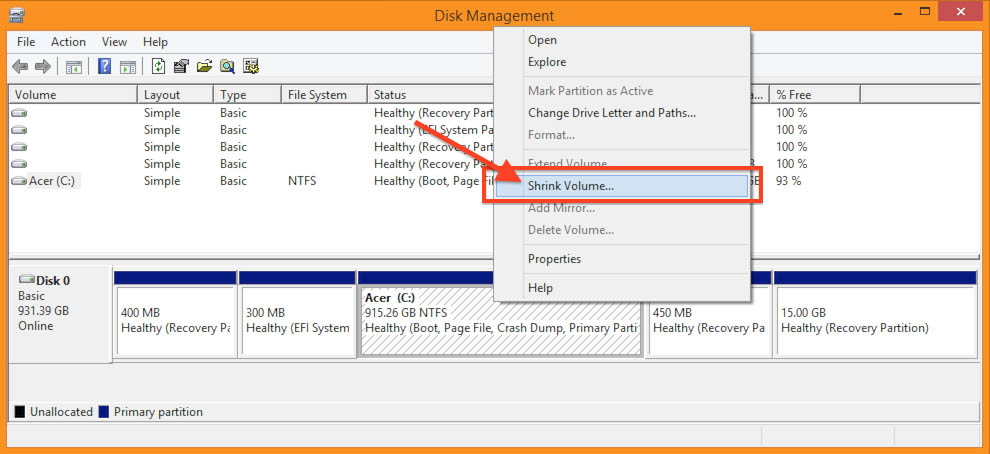
Windows 8.i – Disk Management – Shrink Sectionalisation
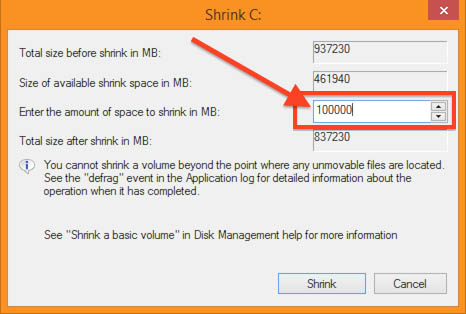
A popup window briefly appears, analyzing available space.
After that a "Shrink C:" window appears where we can define how much space we desire to have away from the C:-bulldoze.
In the field "Enter the amount of space to shrink in MB", we basically enter the corporeality of MB we'd similar our Ubuntu partitioning to be. In the example below, I reserver 100 GB for my Ubuntu partition (100,000). Depending on your disk infinite and Ubuntu needs, you can of class decide on dissimilar values. I would carefully guess that ten GB (10,000) is what you should take equally a minimum, but I'1000 sure that number tin be tuned.
Call up this value … information technology will help you select the correct sectionalization at a later fourth dimension.
Windows 8.1 – Disk Management – Ascertain Ubuntu Division Size
In one case decided how much space you'd similar to use, click the "Compress" push button – this process can be surprisingly fast …
Later on completion, you lot will meet that "Disk Management" indicates a nice chunk of "Unallocated" space – which is exactly where nosotros volition identify our Ubuntu setup.
Step four – Turn OFF Fast Boot
We need to turn of Fast Kick, and then we can really kicking from our USB bulldoze. Annotation that this option might or might non exist applicable for your figurer.
Fast Kick can be found in the Ability Options (Control Panel) and to get there, open a Windows Explorer window and paste "Control Panel\Hardware and Sound\Ability Options" in the address bar and press ENTER.
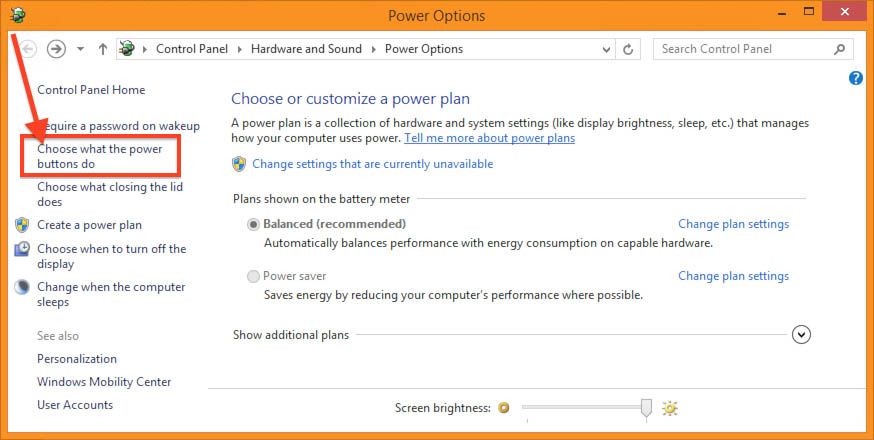
Windows viii.one -Ability Options
In the Power Options window, click the "Change what the power buttons do" option.
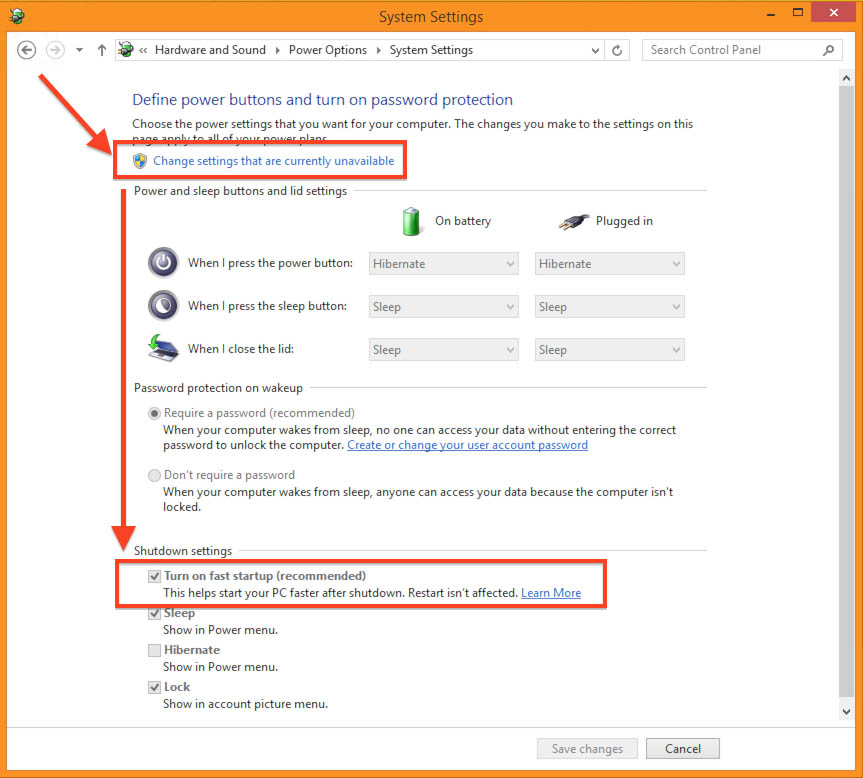
Windows 8.1 -Power Options – Disable Fast Boot
Hither we uncheck the "Turn on fast startup (recommended)" option.
If this option is disabled (grayed out – like shown in a higher place), then first click the "Change settings that are currently unavailable" to enable the option.
When done, click the "Salvage changes" button.
Ad Blocking Detected
Please consider disabling your ad blocker for our website.
We rely on these ads to be able to run our website.
You tin of course support us in other ways (run across Support Us on the left).
Step 5 – UEFI BIOS Settings to Enable kick from USB
Secure Boot is actually a BIOS (or more correct UEFI) option, which makes sure that the computer is only booted with software the PC manufacturer trusts (encounter also this Microsoft TechNet Article). Please note that "Secure Boot" isnot a requirement for any Operating Organization (as far every bit I know), rather an effort by hardware manufacturers to become PC's more "secure" … (can you lot hear me couch?)
"Secure Boot" should not be confused with "UEFI" and "Legacy" kicking mode!
When Windows was installed with UEFI Boot Manner, then changing it to "Legacy" will cripple your Windows.
Before proceeding: Insert the Ubuntu USB Stick we just made, so nosotros can see it when nosotros modify the boot order.
Note : I ran into this article for older Ubuntu versions on Acer.
Getting in to the UEFI BIOS
Selection 1 – Directly
Disabling Secure Kick can be done past going into your "BIOS" at boot up fourth dimension (the usual F1, F2, F12, Del or Esc keys),…
My Acer Laptop required me to press and concord F2 every bit soon as you lot see the Acer logo, and Acer Desktops seem to prefer the Del central instead.
More than details for Acer equipment, read this commodity "How to Enable or Disable Secure Boot" on the Acer website.
Option 2 – Via Windows
Sometimes it's easier to click "Restart" in Windows while holding downwardly the SHIFT fundamental.
In the upcoming screen go to "Troubleshoot" "Advanced Options" "UEFI Firmware Settings" "Restart".
Meet besides: Microsoft Technet.
For those who use "Get-go-Is-Back": The SHIFT trick (option ii) does NOT work in the Start-menu.
Instead, on the login screen, click the ability button (lower correct), press and concur the SHIFT button and click "Restart".
Disabling UEFI Secure Boot
Short version: Become into your (UEFI) BIOS and disable "Secure Boot" …
Long version:
At that place is a cracking variation of what BIOS screens will look similar. The only (UEFI) Windows box I have is my Acer Laptop (Aspire V5-552P-X440), and then I'll base everything on that – other computers might look similar or very different, merely I'm certain that with a lilliputian looking effectually yous'll find what you lot need.
The "Secure Boot" option can exist expected nether the "Security" or "Kicking".
"Secure Boot" Grayed Out …
On some systems, Acer for instance, yous'll first have to fix the "Supervisor Password" on the "Security" screen.
In one case the countersign is set, the "Secure Boot" choice becomes enabled (found in the "Boot" screen!).
In one case "Secure Boot" is set to "disabled", you can remove the "Supervisor Password" by setting it to a blank password.
Definitely recommend removing the password – at that place is goose egg worse than forgetting your BIOS countersign …
Find the "Secure Kick" pick – the 1 that you can set to either "enabled" or "disabled".
This was on my Acer rather disruptive since "Secure Boot" appears on the "Security" screen and the "Kicking" screen.
I figured that one out subsequently some tinkering. Yous will need the 1 on the "Boot" screen.
Set "Secure Boot" to "disabled"!
Don't forget to set the "Supervisor Password" to blank again, if you had prepare it before.
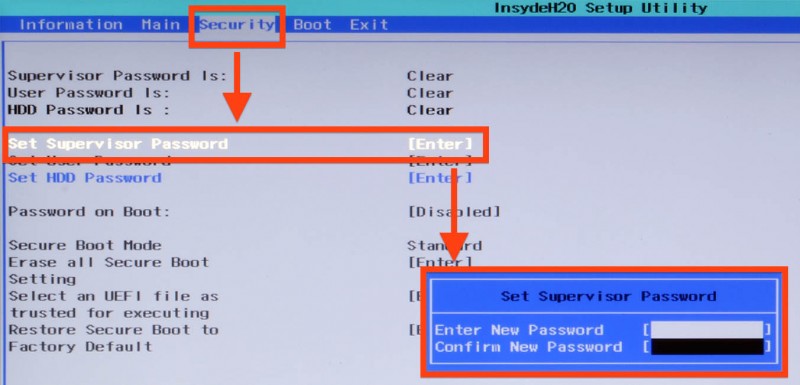
UEFI BIOS – Ready Supervisor password (sometimes temporary needed)
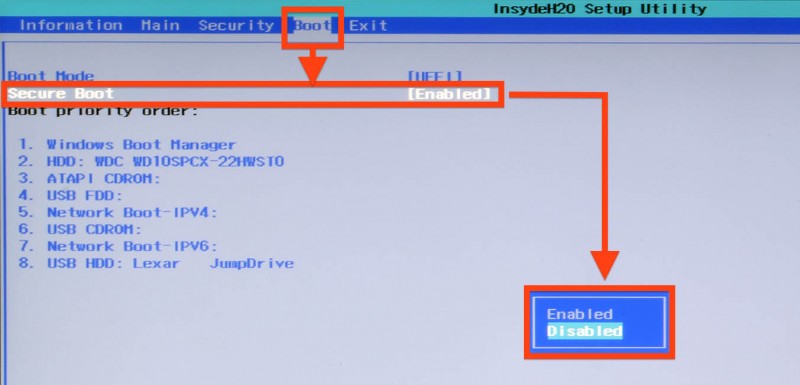
UEFI BIOS – Disable Secure Kicking
Enable booting from USB
Since we're in the BIOS … let's make sure we can kicking from USB …
Selection one (recommended, if your BIOS allows this) is to set the " Boot Card " option.
On my Acer this will enable a menu to select a boot device by printing F12 during boot equally shortly every bit y'all run across the Acer logo.
Handy for future use, and you practice not need to go back into the BIOS later we've installed Ubuntu … (also saves fourth dimension when no USB drive is attached)
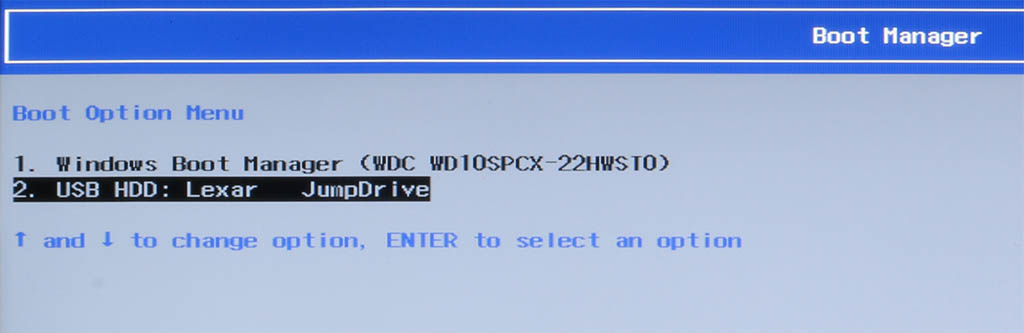
UEFI BIOS – Kick Manager Instance (Acer) – Described in Option 1
Choice 2is to change the " Kick order " in your BIOS – Acer for example defaults to the "Windows Boot Manager" FIRST, instead we need to set our USB Stick with Ubuntu to the first one. No need to remember F12 during kicking … but when you're done with the Ubuntu installation you might want to set up it back the "Windows Boot Manager" as the commencement one, to speed upwardly booting and to forbid annoyance when you forgot to remove a USB drive.
Don't forget to save the settings (under the "Exit" screen) and your computer volition reboot.
Pace half-dozen – Installing Ubuntu
OK, on to the next step: Installing Ubuntu …
Start your computer and make sure it boots from the USB drive.
On my Acer I noticed that the USB drive sometimes does not appear in the boot menu, and a warm reboot (CTRL+ALT+DEL) is needed.
Once booted from your USB drive, you'll run across something like this:
GNU Grub version two.02^beta2-ix
┌───────────────────────────────────────────────────────┐
│ * Try Ubuntu without installing │
│ Install Ubuntu │
│ OEM install (for manufacturers) │
│ Check disk for defects │
└───────────────────────────────────────────────────────┘
Nosotros take two options now, install straight from hither (untested!). or conveniently utilise the graphical interface Ubuntu offers united states of america by booting into Ubuntu directly from the USB drive (the get-go option "Endeavour Ubuntu without installing").
This would the same option yous'd utilize if you determine to e'er run Ubuntu from the USB bulldoze.
Select the option "Try Ubuntu without installing".
Depending on the speed of your USB port and USB drive, Ubuntu will kick pretty quick and show a screen like this:
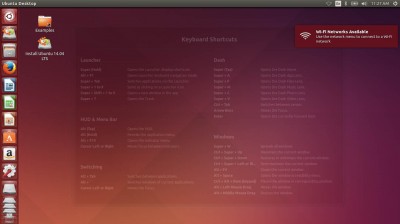
Ubuntu – Running from USB
You will initially see a window with some hints concerning keyboard shortcut. You tin can close this window past clicking thebutton or by clicking somewhere on the desktop.
Next we double click the installation icon on the desktop called "Install Ubuntu fourteen.04 LTS" (proper name will be dissimilar for other Ubuntu versions).
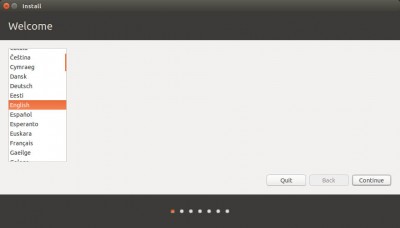
Ubuntu Setup – Select Linguistic communication
A screen will announced where you have to select your preferred language.
Select the language and click "Continue".
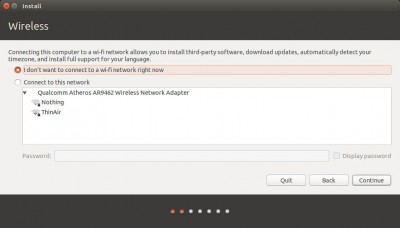
Ubuntu Setup – Enable Wifi/Network
In case your reckoner has WiFi, a dialog volition appear asking for WiFi access. If needed, select your WiFi, enter your WiFi countersign and click "Connect".
Information technology takes a few seconds to connect and strangely enough the screen remains almost like even after connecting.
Annotation that we do need a network connectedness at some betoken …!
Click "Continue" to get to the next screen.
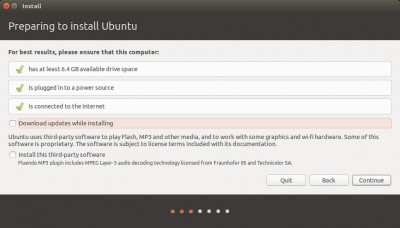
Ubuntu Setup – Download Updates?
In the adjacent screen you tin can optionally choose to right away download the latest updates and 3rd party applications (for Mp3 audio). To speed up the installation process, I skipped this – you can still do the updates and iiird software installation at a later time.
In this screen y'all will likewise encounter the disk space requirements (half-dozen.4Gb), and that an Internet connection and your computer plugged into a power-supply (Laptops) are recommended.
Click "Continue".
If Ubuntu asks to unmount certain mounted partition, so click "No". Your hard-drive should not be mounted at this point anyhow, so it is most likely referring to an boosted drive, like for example an actress USB drive (which I did to save screenshots).
The following screen asks you for what type of install you'd like to do …
Now exist VERY careful here!!!
You want to select the "Something else" selection, the other option will clear the entire hard-drive and that's not what we desire.
Click "Continue" after selecting the "Something else" pick.
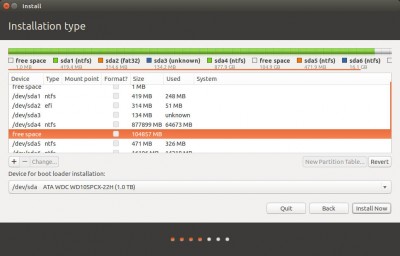
Ubuntu Setup – Sectionalization tabular array
The next screen, afterward a few seconds, shows the layout of your hard-disk partitions. Maybe it looks intimidating, but don't worry.
Be VERY careful here!!!
Here we will select the destination sectionalisation! The selected partition Volition be destroyed!(You lot fabricated a Windows backup right?)
When looking through the list you lot should see at least 1 row with the Device called "complimentary space".
On my difficult-deejay in that location were 3 "free infinite" rows just just one came close to the complimentary space I created earlier when I shrank the C:-bulldoze.
The other two looked like none-sense (1Mb partition? 0Mb partition?).
We are going to split that partition in ii parts, ane for Ubuntu and one for Swap.
Y'all tin can make a 3rd partition if yous prefer for just your files (documents, media, etc) or a fourth for /tmp, etc.
Y'all tin read more almost information technology in "Deciding on Ubuntu Partitions and Sizes".
Since I take a hard time deciding my space needs for my documents, and since I brand a habit out of saving documents on my NAS, I simple decided to use only 2 partitions. One for Ubuntu and i for Swap.
Some people argue that "Swap" is no longer needed.
If y'all decide to create a "Swap" partition, and then a rule of thumb is to brand this sectionalisation twice the size of the amount of RAM your computer has. If deejay space is limited, take ane.5x RAM.
How much memory does my estimator have?
If you're not sure how much retention is installed in your computer, open a Last window and type:
cat /proc/meminfo
The beginning line will say "MemTotal" which shows you how much memory is installed (in kB).
Nosotros will create the first division for Ubuntu. For determining the proper size you will need to know how much swap infinite you want to employ and I used the 2x RAM rule. I take 8Gb of memory in my laptop and then the swap size will be 16 Gb.
Since my "gratis space" is 104857 MB (say 100 GB), I have to reserve 16Gb for the swap partition. Yous tin do the math with Google.
Open a Google Window in your browser and type "104857 MB – sixteen GB in MB" and Google volition give you lot the answer:88857 MB.
Obviously yous volition demand to practise this with your numbers to become the correct answer for you. Watch the uppercase MB and GB!
OK, so I will end up with a 84Gb (88.857 MB) Ubuntu partitioning and a 16Gb Swap partition – let's practise it …
Select the "complimentary space" row that looks similar the free infinite you lot created before.
Click the " + " push button at the left, nether the list of partitions.
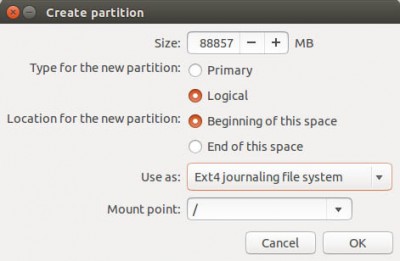
Ubuntu Setup – Root Sectionalisation
As shown in a higher place:
In the field "Size" we enter the calculated number (which was 88857 for me),
set the "Blazon of the new partition" to " Logical ",
set up "Location for the new partition" to " Beginning of this space ",
set "Utilise equally" to " Ext4 journaling file organisation ",
set "Mount point" to " / " (root).
Click "OK" to apply these changes.
Afterward Ubuntu created this partition, the list of partitions will exist updated.
Find the row you just created (expect at the "Size" column and the "Type" column, which should reflect the number you just entered and the "ext4").
The immediately following row should be "complimentary space" and accept the size we calculated for our swap space.
Select this row.
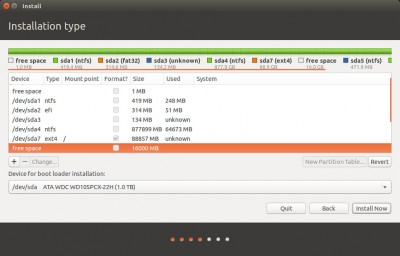
Ubuntu Setup – Space left for Swap
Once you selected the "complimentary space" row, of the size you determined for your swap partition, click the " + " beneath the sectionalisation listing again.
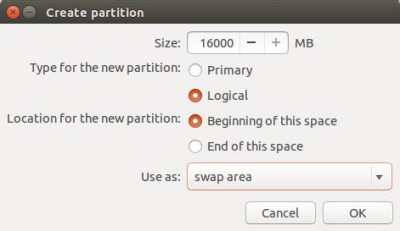
Ubuntu Setup – Swap Segmentation
As shown above:
The "Size" field should already concord the right value (the desired swap partition size).
Set "Type for the new partitioning" to " Logical " over again,
set "Location for the new partition" to " Beginning of this infinite ",
and set "Use as" to " bandy area ".
Click "OK" to utilize these changes.
By default the boot-loader volition be installed on "/dev/sda" – do not change that value, and unless you have multiple disks and really know what you're doing.
I'g not sure if information technology's needed, but my paranoia makes me select the partition that we just created for Ubuntu, before continuing.
Click "Install At present" if you're comfortable with the partitions we just made and installation will begin.
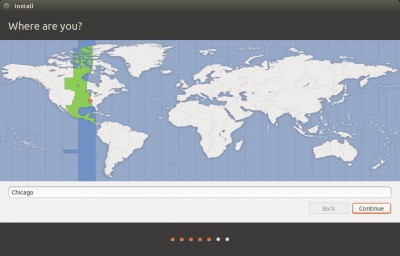
Ubuntu Setup – Location
In the next screen you'll have to select your location – you lot can type your location to see if it's in the list or find a location nigh you lot.
Click "Go on" when washed.
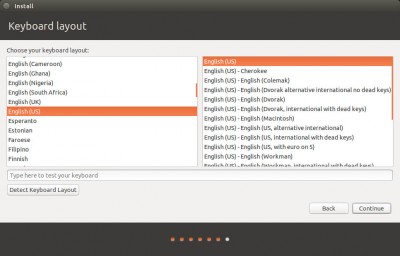
Ubuntu Setup – Keyboard
In the next screen we select our keyboard, and click "Go on".

Ubuntu Setup – Create User Account
In the next step we will create a user account.
Upward to you what names you'd like to enter and if you like login to be automatically.
When completed, click "Continue" and installation will starting time.
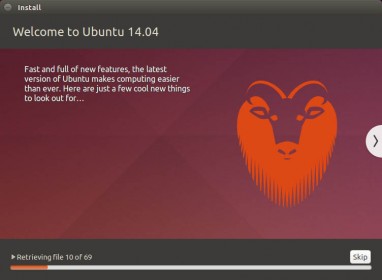
Ubuntu Setup – Installing ….
Installation, depending on your setting, can take a while, and then this might be a good time to walk the domestic dog or get a snack.
At the finish of the process, Ubuntu will enquire to reboot your computer – DONon REBOOT and stay in the Ubuntu Live environment. We still need to tweak a few things, because at this signal your computer will boot straight into Windows again.
Click "Proceed Testing".
Advertizing Blocking Detected
Please consider disabling your advertizement blocker for our website.
Nosotros rely on these ads to be able to run our website.
You can of grade back up the states in other ways (see Support United states of america on the left).
Step seven – Getting Dual Boot Windows eight.x and Ubuntu to work
When we boot our computer at this point, it will become to Windows right away, which is non what you lot'd await from "Dual Kick". So nosotros demand to repair a few things.
If you screwed up and rebooted anyhow: reboot your computer and boot from the Ubuntu USB stick.
Before we proceed, nosotros practice need a network/Internet connection! So if you are not connected yet – do and then at present (click the network icon in the upper correct corner and follow the steps).
Start nosotros volition use a lilliputian plan chosen "Boot Repair" which by default is Non installed, and then we will take to install it.
Open a Terminal window (click the Ubuntu icon in the upper left corner and type "terminal" and click the "Terminal" icon).
Type the post-obit statements (more info at Ubuntu Help):
                                                                                            1
2
3
4
                                                                                                  sudo                      add together-apt-repository ppa:yannubuntu/boot-repair
                      sudo                      sed                      's/trusty/saucy/one thousand'                      -i                      /etc/apt/sources.list.d/yannubuntu-boot-repair-trusty.list
                      sudo                      apt-get update
                      sudo                      apt-get install                      -y                      kicking-repair                      &&                      (boot-repair                      &                      )
These statements will add a repository so nosotros can get "Kicking Repair", update your setup, install "Boot Repair" and finally start "Boot Repair".
Quite a lot of messages volition fly by and eventually Boot Repair starts scanning.
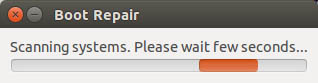
Kick Repair – Scanning your drives
At the stop of the scan information technology will well-nigh probable notify you that EFI was detected, just click "OK".
Right after a warning appears nearly packages that will exist installed, just click "OK" again and the main window of "Boot Repair" will show.
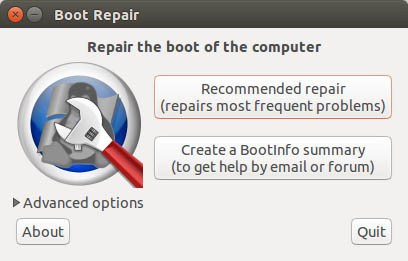
Kicking Repair – Main Window
Hither we click the "Recommended repair" push button, and "Kicking Repair" will do information technology'due south magic.

Boo Repair – Repair in progress
Later a few seconds a message might appear. In this message you're asked to copy and paste the statements displayed and execute them in Terminal. And so we open some other Final window. Correct click the text (possible cull "Select All" first) and select "Re-create". Side by side go to the new Concluding window y'all just opened, right click in the window and choose "Paste".
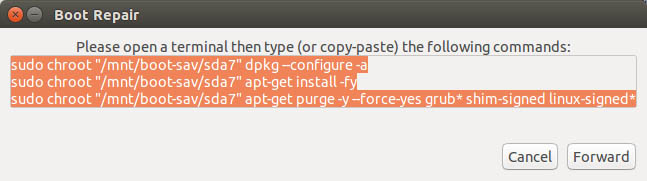
Kicking Repair – Execute these lines in Concluding
Yous might notice that the first statements will be executed, only the terminal argument is simply sitting there. Press ENTER to execute this last line besides.
Again a lot of info flying by …
Once y'all come across the prompt render in the Final window, click "Frontward" in the bulletin window from which we just copied the statements.

Boot Repair – Execute these lines in Final as well
Again a window opens with text that we need to copy and execute in terminal, so echo the same steps we just did.
And again a lot of info flying by …
In one case Terminal completed the task, click the "Forrad" button in the message window, equally we did before.
"Boot Repair" volition now reinstall Grub.
Some people, like myself, come across an fault bulletin at the finish saying "An error occurred during repair".
If you'd like you can write down the link, but honestly: I wouldn't know what to do with it anyway – I did await at it though … but nevertheless don't know what to with it.
Click "OK" .
In one case "Boot Repair" finished it's magic, fourth dimension to become to the side by side step: Fixing the kicking-loader from the Windows end of things.
Reboot your figurer … and about likely your computer volition boot straight into Windows …
Once Windows is booted, login and kickoff a command prompt as administrator.
The easiest way to do this is by pressing the Windows fundamental + X. ( + Ten)
In the opening window select "Control Prompt (Admin)".
In the command prompt window type the following and printing ENTER:
bcdedit / set "{bootmgr}" path \EFI\ubuntu\grubx64.efi
You can now close the command prompt and reboot your estimator.
During the boot of your estimator you should at present come across a menu that allows yous to boot – your menu may await different.
I recommend testing "Ubuntu" and "Windows Boot Manager" – just to make sure it all works equally expected.
GNU Grub version 2.02^beta2-ix
┌───────────────────────────────────────────────────────┐
│ * Ubuntu │
│ Advanced options for Ubuntu │
│ Windows Boot Director (on /dev/sda2) │
│ Organization setup │
└───────────────────────────────────────────────────────┘
If your computer is NOT booting into the Grub Bootloader …
I ran into this consequence myself. My computer (Acer Aspire V5 552P) has a priority listing in the BIOS ("Boot" screen) which sets the "Windows Boot Manager" as the highest priority. To get Grub to appear, I had to requite my hard-deejay hghest priority past moving information technology to the get-go position.
Later on doing that Chow booted just fine.
An application (untested!) like EasyUEFI, which runs under Windows, might be of help for this as well.
Source: https://www.tweaking4all.com/os-tips-and-tricks/uefi-dual-boot-windows81-ubuntu/
Posted by: brennanweared.blogspot.com
0 Response to "How To Dual Boot Windows 8 And Linux"
Post a Comment